 Web Hosting
 Windows HostingBuilt for Windows apps and websites – stability, speed and flexibility
 Reseller HostingLaunch a hosting business without technical skills or expensive infrastructure
 Affiliate ProgramRefer customers and earn commissions from sales across our platform
 Domain SearchFind and secure a domain name in seconds with our quick lookup tool
 All DomainsExplore domain names from over 324 TLDs globally – all in one place
 Free Whois Lookup Tool South Africa
 VPS
VPS SSLs
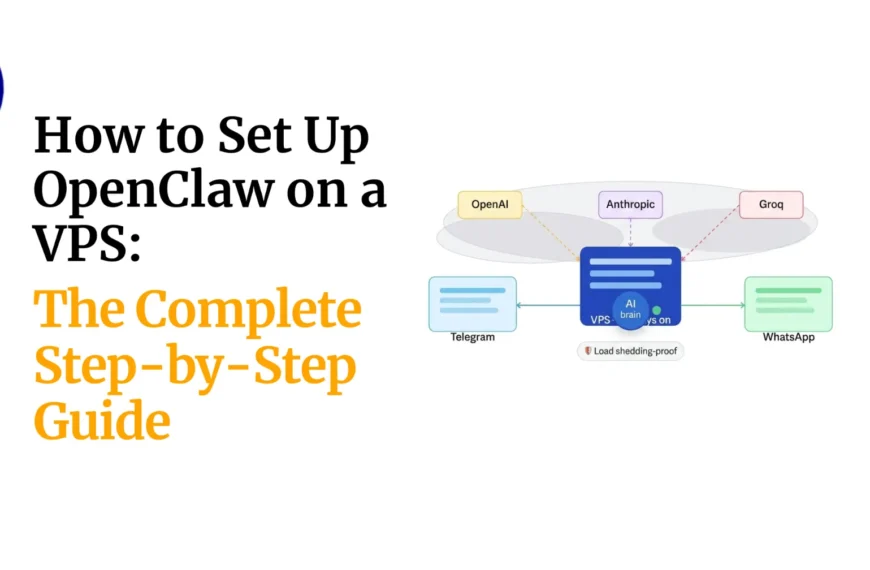
SSLsOpenClaw just crossed 380,000 GitHub stars as of June 2026.
That makes it the fastest-growing open-source project in history, outpacing React, TensorFlow, and Vue in star velocity within its first quarter.
The reason behind that growth? You get a personal AI agent that runs 24/7, connects to Telegram, WhatsApp, Discord, and 20+ other platforms, and answers to you, not a SaaS company.
But getting started is where most people get stuck.

Which packages do you install first? Does Docker go before Node.js? What about the firewall?
What stops someone from accessing your gateway while it’s running?
I’ll walk you through deploying OpenClaw on Ubuntu, from your first SSH login to a fully secured, always-on AI agent.
Table of Contents
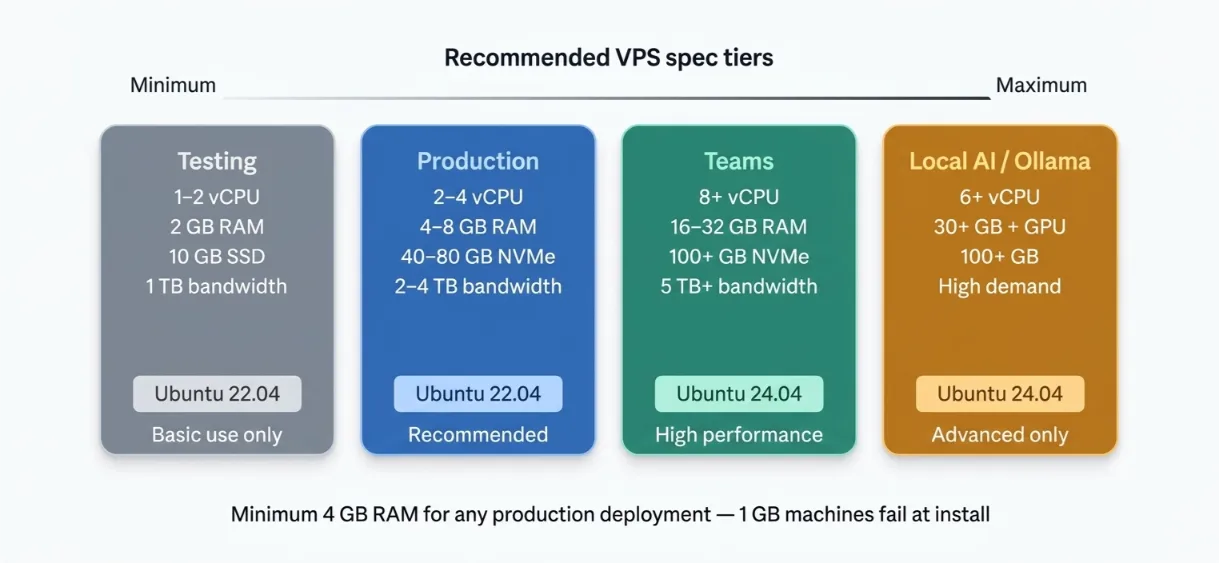
Recommended VPS Specs for OpenClaw
Before you spin up a server, know what you need. OpenClaw is a multi-component Docker stack, Node.js runtime, bundled skills, conversation history, and optional browser automation. It is not a lightweight CLI tool.
| Setup | CPU | RAM | Storage | Bandwidth | OS |
|---|---|---|---|---|---|
| Minimum (Testing) | 1–2 vCPU | 2 GB | 10 GB SSD | 1 TB | Ubuntu 22.04 |
| Recommended (Production) | 2–4 vCPU | 4–8 GB | 40–80 GB NVMe | 2–4 TB | Ubuntu 22.04 |
| High Performance (Teams) | 8+ vCPU | 16–32 GB | 100+ GB NVMe | 5 TB+ | Ubuntu 24.04 |
| Local AI Models (Ollama) | 6+ vCPU | 30+ GB RAM + GPU 12 GB+ VRAM | 100+ GB | — | Ubuntu 24.04 |
Notes:

- Use NVMe SSD where possible; standard SSD works, but NVMe handles logs and concurrent I/O much better
- Keep at least 5 GB free for logs and conversation history at all times
- Start from a clean Ubuntu install to avoid package conflicts
- 1 GB machines fail during installation due to out-of-memory errors. The practical minimum for production is 4 GB RAM with 2 vCPU
- Local AI models like Ollama need extra RAM and a GPU, start with cloud APIs (Claude, GPT-4o) to keep costs low and the setup simple
What You Need Before You Start
Get these ready before you open your terminal. It saves time.
- A Truehost Ubuntu VPS has plans pre-sized for OpenClaw
- An API key from Anthropic (Claude), OpenAI, or OpenRouter
- A Telegram account is the easiest first messaging channel, no port forwarding required
- A registered domain name is optional for a basic test setup, required once you add SSL
- An SSH client: PuTTY for Windows, Terminal for Mac or Linux
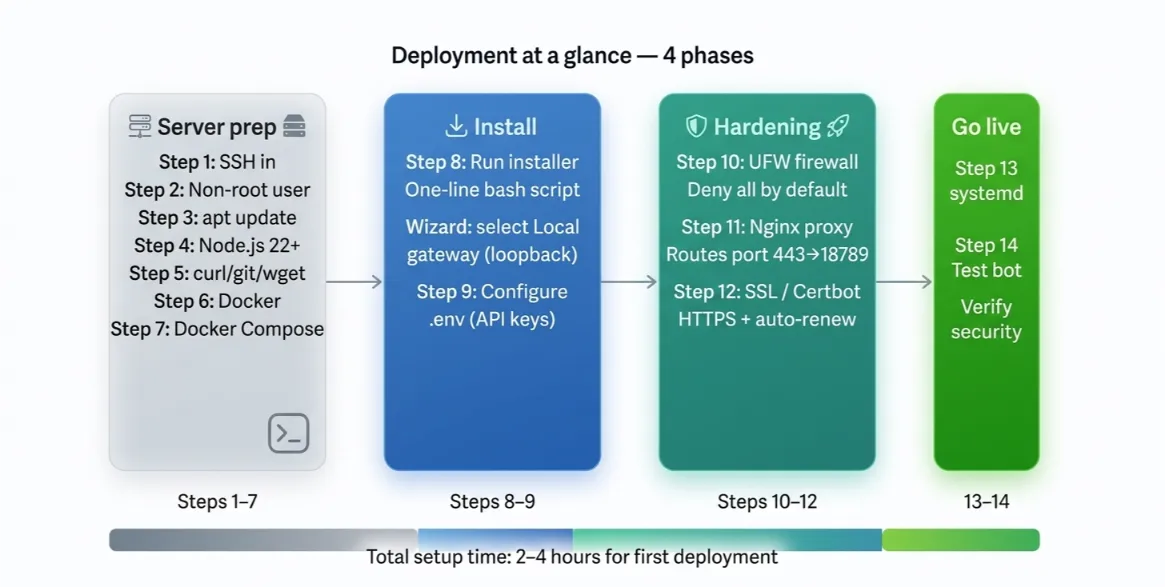
Step 1: Connect to Your VPS via SSH
Windows: Download PuTTY → enter your server IP → set port to 22 → connection type SSH → click Open → login as root → enter your password.
Mac/Linux: Open Terminal → run ssh root@YOUR_SERVER_IP → enter your password.
You are now in. Everything from here runs inside this terminal session.
Check our guide on the 9 best VPS providers for OpenClaw
Step 2: Create a Non-Root User
Running OpenClaw as root is a serious security risk. If a skill misbehaves or gets compromised, the blast radius is your entire server every file, every credential, everything.
Create a dedicated user instead:
adduser openclaw
usermod -aG sudo openclaw
Copy your SSH key to the new user, then switch to it:
su - openclaw
From this point, run all commands as this user. Do not go back to root unless you have to.
Step 3: Update the Server
apt update
apt upgrade -y
This installs the latest security patches and keeps the system stable before you add any OpenClaw dependencies. Skip this step, and you risk compatibility issues later.
Related: Cheapest VPS Hosting Deals in South Africa
Step 4: Install Node.js 22+
OpenClaw requires Node.js version 22 or higher. Older versions will fail during installation. As of May 2026, the recommended version is Node 24, with Node 22.14+ as the minimum supported fallback.
Install from the NodeSource repository:
curl -fsSL https://deb.nodesource.com/setup_22.x | sudo -E bash -
sudo apt install -y nodejs
node --version  # should print v22.x.x
If the version is lower than 22, the installer will warn you. Fix it before moving on.
Step 5: Install Required Packages
apt install -y curl wget git unzip sudo
These tools handle file downloads, package management, and running installation scripts. OpenClaw’s installer relies on several of them.
Step 6: Install Docker
curl -fsSL https://get.docker.com -o get-docker.sh
sh get-docker.sh
docker --version  # verify: Docker version 26.x.x
Docker provides container isolation. It keeps OpenClaw’s environment clean and separate from the rest of your server. This is important for both stability and security, especially given the CVE-2026-25253 remote code execution vulnerability disclosed earlier this year.
Read also: Can You Host n8n for Free on a VPS?
Step 7: Install Docker Compose
apt install docker-compose-plugin -y
docker compose version  # verify installation
Docker Compose manages the multi-container stack OpenClaw runs on. You will use it to start, stop, and update your agent.
Step 8: Run the OpenClaw Installer
OpenClaw provides a one-line installer that handles the setup automatically:
curl -fsSL https://openclaw.ai/install.sh | bash
Installation takes 10–30 minutes, depending on your VPS speed. An interactive setup wizard launches automatically when it finishes.
Work through the wizard options carefully:
- Confirm the security disclaimer
- Select the Manual for onboarding mode
- Gateway type: Local Gateway on loopback address (127.0.0.1)
- Workspace directory: press Enter for the default
- AI provider: Anthropic (Claude) is recommended for reliability
- Enter your API key
- Gateway port: press Enter for the default (18789)
- Gateway bind: Loopback (127.0.0.1), this is a critical security setting; do not skip it
- Gateway auth: press Enter to auto-generate a token
- Package manager for skills: npm
The loopback binding in step 8 is the single most important security decision in the entire guide. It keeps your gateway off the public internet.
Step 9: Configure the .env File
nano /opt/openclaw/.env
Inside this file, set the following:
- Your API key (Anthropic, OpenAI, or OpenRouter)
- Your Telegram bot token, get it from @BotFather on Telegram
GATEWAY_HOST=127.0.0.1This keeps the gateway on loopback only
After saving, lock down the file permissions:
chmod 600 /opt/openclaw/.env
Two absolute rules for this file:
- Never commit
.envto version control - Never hardcode keys anywhere else in the project
If your keys leak, an attacker can run API calls on your account. Rotate compromised keys immediately.
Step 10: Configure UFW Firewall
sudo ufw default deny incoming
sudo ufw default allow outgoing
sudo ufw allow 22/tcp
sudo ufw limit 22/tcp
sudo ufw allow 80/tcp
sudo ufw allow 443/tcp
sudo ufw enable
sudo ufw status
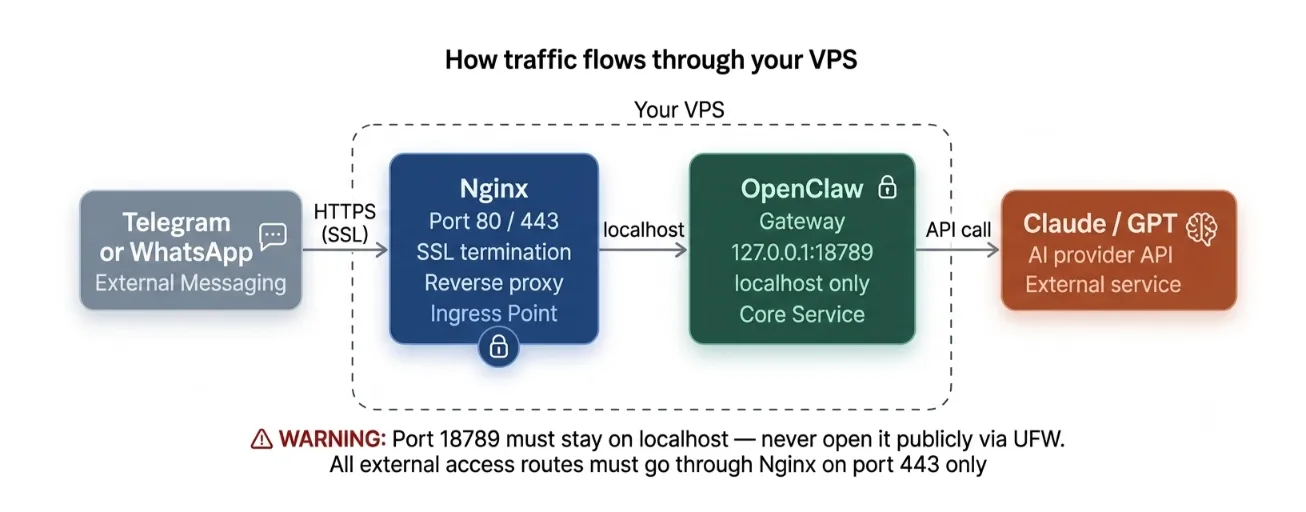
This firewall setup denies all incoming traffic by default. Only SSH, HTTP, and HTTPS are allowed through.
Do not open port 18789 publicly. That is the OpenClaw gateway port. It must stay on localhost only. If it binds to 0.0.0.0:18789, anyone on the internet can reach your agent directly.
The ufw limit 22/tcp rule rate-limits SSH connections. It slows down brute-force login attempts without locking you out.
Step 11: Install and Configure Nginx as Reverse Proxy
All external traffic routes through Nginx. The gateway stays on localhost. This is the standard, secure architecture for any self-hosted web service.
Install Nginx:
sudo apt install nginx -y
Create a server block at /etc/nginx/sites-available/openclaw. Your configuration should:

- Proxy pass to
http://127.0.0.1:18789 - Set the correct WebSocket headers (
Upgrade,Connection) - Set
proxy_read_timeout 86400This prevents Nginx from closing long-running WebSocket connections mid-session
Enable the site and reload Nginx:
sudo ln -s /etc/nginx/sites-available/openclaw /etc/nginx/sites-enabled/
sudo nginx -t
sudo systemctl reload nginx
Step 12: Add SSL with Certbot
Your Nginx config now works over HTTP. Add HTTPS with Let’s Encrypt.
sudo apt install certbot python3-certbot-nginx -y
sudo certbot --nginx -d yourdomain.com
Certbot automatically reconfigures your Nginx server block for HTTPS and sets up auto-renewal. Your gateway is now accessible at https://yourdomain.com with a valid certificate.
Let’s Encrypt certificates expire every 90 days. Certbot handles renewal automatically via a systemd timer; no action needed on your part.
Step 13: Run OpenClaw as a systemd Service
Without systemd, OpenClaw stops the moment you close your SSH session. That defeats the entire point of a VPS deployment.
Create a service file at /etc/systemd/system/openclaw.service. Main settings to include:
Restart=alwaysRestart on crash automaticallyWantedBy=multi-user.targetstart on bootUser=openclawRun as the dedicated user, never root
Enable and start the service:
sudo systemctl enable openclaw && sudo systemctl start openclaw
Verify it is running:
sudo systemctl status openclaw
You should see active (running) in green. If you see anything else, check the logs with journalctl -u openclaw -f.
Step 14: Test Your Deployment
Open your Telegram bot and send /start.
If the bot responds, the full stack is working. Your message traveled from Telegram → Nginx → OpenClaw Gateway → Claude API → back through the same route.
Now kill the manual process if you still have one running and let systemd take full control.
Verify the Deployment Is Secure
Do not skip this section. A misconfigured gateway is the most common OpenClaw security failure in 2026. Earlier this year, security researchers found 30,000–42,000 publicly exposed OpenClaw instances, 93% with no authentication.
Run these checks before you call the deployment done:
- Check gateway binding: confirm
127.0.0.1:18789not0.0.0.0:18789If it shows0.0.0.0:18789, runopenclaw configureand select Local immediately - Check firewall status:
sudo ufw statusVerify port 18789 is not listed - Monitor logs:
docker compose logs -f - Run security audit:
openclaw security audit --deep
Manage Your OpenClaw Instance
Once deployed, you manage OpenClaw through Docker Compose and systemd.
Daily management:
- Restart containers:
docker compose restart - Stop OpenClaw:
docker compose down - Start again:
docker compose up -d - Restart systemd service:
sudo systemctl restart openclaw - Check logs:
docker compose logs -f
Updating OpenClaw:
Pull the latest from GitHub, then restart containers. Always check the changelog before updating on a production server. Skill API changes occasionally break existing automations.
Common Errors and Fixes
| Error | Cause | Fix |
|---|---|---|
openclaw: command not found after install | npm global bin not in PATH | Add $(npm prefix -g)/bin to ~/.bashrc then open new terminal |
| Out-of-memory error during install | VPS has less than 2 GB RAM | Upgrade to a minimum 4 GB RAM plan |
Gateway on 0.0.0.0:18789 | Wrong wizard selection | Run openclaw configure → select Local (this machine) |
| Dashboard unreachable in browser | UFW blocking or Nginx not configured | Confirm UFW allows 80/443; verify Nginx config and reload |
| Bot not responding on Telegram | Wrong bot token or .env not saved | Re-check .env file, confirm GATEWAY_HOST=127.0.0.1, restart service |
| SSL certificate error | Domain not pointed to server IP | Update DNS A record, wait for propagation, re-run Certbot |
Skip the Manual Setup with Truehost OpenClaw Hosting
The 14-step process above works. But it takes time, typically 4–8 hours for a first deployment, plus 2–4 hours a month for maintenance, patching, and monitoring.
We at Truehost South Africa offer OpenClaw VPS plans with OpenClaw pre-configured and ready to use. Our data center is local, which means lower latency for South African users compared to European or US-based hosting.
Manual setup vs. Truehost OpenClaw Hosting:
| Manual Setup | Truehost OpenClaw Hosting | |
|---|---|---|
| Time to first agent | 4–8 hours | Minutes |
| Config errors | Common | Pre-handled |
| SSL & Nginx | You configure | Pre-configured |
| Local data center | Depends on provider | South Africa |
| Support | Community forums | Truehost support team |
Our plans start at R285/month for OpenClaw KVM1.
If you want control without the setup overhead, this is the fastest path.
OpenClaw on an Ubuntu VPS FAQ
Which Ubuntu version is best for OpenClaw?
Ubuntu 22.04 LTS is the most widely tested and recommended version for OpenClaw deployments. It has the best Docker compatibility, strong community documentation, and LTS support through 2027. Ubuntu 24.04 is supported and works well for high-performance or team setups.
How do I keep OpenClaw running after I close my SSH session?
Use systemd. Create a service file at /etc/systemd/system/openclaw.service, enable it with sudo systemctl enable openclaw, and start it. systemd will restart OpenClaw automatically on crash and bring it back on every server reboot.
Is Docker required to install OpenClaw?
Yes, for the standard VPS deployment. Docker provides container isolation that keeps OpenClaw stable and separates it from other services on your server. It also makes updates straightforward: pull the latest image, restart the container.
Can I run OpenClaw on a 1 GB RAM VPS?
No. A 1 GB machine will fail during installation due to out-of-memory errors. The Node.js runtime, Docker containers, and the OpenClaw gateway together exceed 1 GB at startup. Start with at least 2 GB for testing and 4 GB for anything production-grade.
What are the minimum VPS specs to run OpenClaw?
The practical minimum for production is 2 vCPU and 4 GB RAM with 40 GB SSD storage, running Ubuntu 22.04 LTS. For testing only, 2 GB RAM can work, but expect instability under load.
Is it safe to run OpenClaw on a VPS?
Yes, if configured correctly. The critical steps are binding the gateway to 127.0.0.1 (not 0.0.0.0), enabling the UFW firewall, routing all traffic through Nginx, and adding SSL. Skipping any of these exposes your gateway to the public internet. Earlier in 2026, tens of thousands of misconfigured instances were found exposed online.
What messaging platforms does OpenClaw support?
OpenClaw supports over 20 platforms including Telegram, WhatsApp, Discord, Slack, Signal, Google Chat, iMessage, Microsoft Teams, IRC, Matrix, LINE, Twitch, and more. Telegram is the easiest starting point because it requires no port forwarding.
Do I need a domain name to deploy OpenClaw on a VPS?
Not for a basic setup. You can test through SSH tunnels or direct IP access. But for a permanent, production deployment with HTTPS, yes, you need a domain name pointed to your server IP for Certbot to issue a valid SSL certificate. If you don’t have a domain yet, we at Truehost can help you register one at truehost.co.za.